# 如何在 Jupyter Notebook 中存取 Object storage
在存取 Object Storage 前,請確認您已擁有:
(1) Jupyter Notebook 的運行環境,且此環境具備連網能力 (2) 已有存取 Object Storage 的 AccessID 與 SecretKEY
由於可用的 s3 用戶端(client)頗多,我們使用 s3cmd 為例說明如何在 Jupyter Notebook 中存取 Object Storage 的方式。
# 1. 開啟 Jupyter Notebook/Terminal
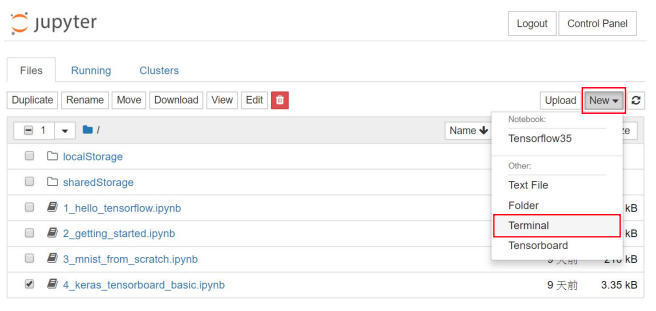
在 Jypyter Dashboard 畫面右方,點選 NewTerminal,開啟 Terminal 視窗

# 2. 安裝 s3cmd
在 terminal 視窗中執行 pip list | grep s3cmd 檢查是否已安裝,如下圖查詢結果出現 s3cmd X.X.X 即表示此環境已安裝好 s3cmd。
若查詢結果為空,則代表尚未安裝,您可直接下達 pip intall s3cmd 進行安裝,出現 Successfully installed ….便表示已安裝成功

# 3. 配置 s3cmd
$ s3cmd --configure -c ~/.s3cfg
出現提示訊息,並依照提示問題填入正確的值。
Enter new values or accept defaults in brackets with Enter.
Refer to user manual for detailed description of all options.
Access key and Secret key are your identifiers for Amazon S3. Leave them empty for using the env variables.
| 問題 | Value: 參考範例(請依照實際資料填寫) |
|---|---|
| Access Key | 8ff040ff9b58492990e16a61a4------ |
| Secret Key | a27e54bd2b9c46bf8926568b7f------ |
| Default Region [US] | -- |
| S3 Endpoint [s3.amazonaws.com] | 172.18.19.21:13808 |
| DNS-style bucket+hostname | -- |
| Encryption password | -- |
| Path to GPG program [/usr/bin/gpg] | -- |
| Use HTTPS protocol [Yes] | Yes |
| HTTP Proxy server name | -- |
| Test access with supplied | -- |
| credentials? [Y/n] | n |
| Save settings? [y/N] | y |
Value 為空者,可直接按下 enter 使用預設值
填答完畢後,將會在 home 目錄下產生一 s3cfg(~/.s3cfg),此時,我們需要進一步編輯此檔以完成設定。
$ vi s3login.cfg
找到以下參數並進行修改,將等號”=”後面的內容修改為正確的值後儲存便完成 s3cmd 的配置作業了。
| 參數 | Value 參考範例(請依照實際資料填寫) |
|---|---|
| cloudfront_host | 172.18.19.21:13808 |
| host_bucket | 172.18.19.21:13808/%(bucket) |
| signature_v2 | True |
| Website_endpoint | https://172.18.19.21:13808/%(bucket) |
# 4. 使用 s3cmd
由於 s3cmd 的 command 眾多,以下我們僅介紹幾個常用的命令,如需詳細命令列表,可執行 s3cmd 以便列出完整的 help 說明。透過 s3cmd 訪問 RADOSGW 時,由於我們並未配置客戶端憑證,故下達s3cmd 時必須包含 option: --no-check-certificate 否則會因為未配置憑證而報錯。
例如:
$ s3cmd --no-check-certificate mb s3://mybucket
若不想每次使用 s3 都帶此 option,可以透過建指令別名:alias 來簡化輸入。
$ alias s3cmd='s3cmd --no-check-certificate'
讓此別名永久有效
$ echo "alias s3cmd='s3cmd --no-check-certificate '" >>
~/.bashrc

$ source ~/.bashrc
# 4.1 建立 bucket
$ s3cmd mb s3://mybucket
Bucket 's3://mybucket/' created
# 4.2 上傳檔案至 bucket 中
$ s3cmd put 1_hello_tensorflow.ipynb s3://mybucket
upload: '1_hello_tensorflow.ipynb' -> 's3://mybucket/1_hello_tensorflow.ipynb' [1 of 1] 25023 of 25023 100% in 0s 207.76 kB/s done
# 4.3 列出某一路徑下的檔案或 bucket
$ s3cmd ls s3://mybucket
2018-11-15 03:40 25023 s3://mybucket/1_hello_tensorflow.ipynb
# 4.4 從 bucket 中取得檔案
$ s3cmd get s3://mybucket/1_hello_tensorflow.ipynb /tmp
download: 's3://mybucket/1_hello_tensorflow.ipynb' -> '/tmp/1_hello_tensorflow.ipynb' [1 of 1] 25023 of 25023 100% in 0s 108.27 kB/s done
# 4.5 刪除 bucket 中的檔案
$ s3cmd del s3://mybucket/1_hello_tensorflow.ipynb
delete: 's3://mybucket/1_hello_tensorflow.ipynb'
# 4.6 刪除 bucket
$ s3cmd rb s3://mybucket
Bucket 's3://mybucket/' removed
# 4.7 Sync 檔案
例如: 從 s3://testbucket2 sync 至/tmp/mybucket 目錄
$ s3cmd sync --no-preserve s3://testbucket2 /tmp/mybucket
download: 's3://testbucket2/1_hello_tensorflow.ipynb' -> '/tmp/mybucket/1_hello_tensorflow.ipynb' [1 of 6] 25023 of 25023 100% in 0s 247.52 kB/s done download: 's3://testbucket2/2_getting_started.ipynb' -> '/tmp/mybucket/2_getting_started.ipynb' [2 of 6] 164559 of 164559 100% in 0s 564.76 kB/s done download: 's3://testbucket2/3_mnist_from_scratch.ipynb' -> '/tmp/mybucket/3_mnist_from_scratch.ipynb' [3 of 6] 209951 of 209951 100% in 0s 924.68 kB/s done download: 's3://testbucket2/4_keras_tensorboard_basic.ipynb' -> '/tmp/mybucket/4_keras_tensorboard_basic.ipynb' [4 of 6] 3348 of 3348 100% in 0s 31.83 kB/s done download: 's3://testbucket2/eula.3082.txt' -> '/tmp/mybucket/eula.3082.txt' [5 of 6] 17734 of 17734 100% in 0s 55.82 kB/s done Done. Downloaded 420615 bytes in 1.0 seconds, 401.72 kB/s
$ ls -l /tmp/mybucket

備註: 因 S3 object 已與文件系統”屬性”一起保存。當您將它們同步到本地目錄時,默認情況下 s3cmd sync 將嘗試恢復這些屬性,包括 uid、gid 所有權等。要防止 s3cmd 執行此操作,請加上 option: --no-preserve,否則您將會看到警告訊息: “WARNING: xxxx not writable: Operation not permitted”同理,我們亦可從 local sync 回 RADOSGW 的 bucket。
$ s3cmd sync /tmp/mybucket s3://testbucket2
# 附錄
← 參考文件